
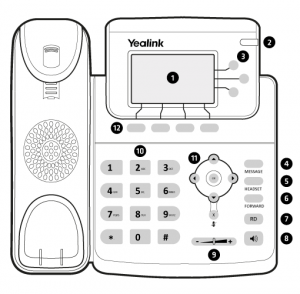
1 – LCD screen
2 – phone status light
3 – service line selection
4 – access to voicemail
5 – put in headset mode (headphones)
6 – call forward
7 – redial last number (redial)
8 – put on speakerphone
9 – call/ringer volume
10 – alphanumeric keyboard
11 – Navigation buttons/mic mute
12 – selection buttons
Answer a call
To answer a call, lift the handset or press one of the following buttons:
- “meet” (12)
- “loudspeaker” (8)
- “helpline” (3).
Start a call
To initiate a call, you can do it in the following ways:
- Dial the desired number and pick up the handset
- Pick up the handset and dial the desired number
- Dial the desired number and the “dial” button (3)
- Dial the desired number and press the “loudspeaker” button (8).
To make outgoing calls, enter a zero (0) before the desired number.
Put a call on hold
- With the call in progress, press the “Hold” button (12).
- To resume the call, press the “resume” button (12).
Transfer a call
- With the call in progress, press the “transfer” button (3), dial the desired number and press “transfer” (3) again.
Conference call
- With the call in progress, press the “conf.” (12) and dial the extension number to be added to the conference.
- Press the “conf.” (12) again.
Pull call from another extension (pickup)
- Dial ** followed by the extension you want to pull.
If it is an extension in the same group, dial *8.
Pickup groups are defined by DSI.
Consult voicemail
- Press the “message” button (4) to consult voicemail messages.
View missed/received/outgoing calls
- Press the “history” button (12) to consult the list of missed, received and made calls.
- To mark, press “mark” (12).
Save contact in phone book
- To save a contact, press the button “list t.” (12) > Local Directory (“enter” button) > Contact List (“enter” button) > “Add” button.
- Insert the contact details you want to add.
- Press the “record” button (12).
Call forwarding
To divert calls, press Menu > Features > Forward
The following options appear:
- Always – divert all calls
- Not answered – divert after some time of not answering
- Busy – divert if the extension is busy.